Vue Routing
The Vue application is navigated through routing, which occurs on the client side (in the browser) without requiring a complete page reload, making the user experience faster.
Similar to how we have used dynamic components previously, routing is a means of navigation.
We may use routing to point someone to a certain location within our Vue application using just the URL address.
Navigate Using a Dynamic Component
Let’s start by examining an application that employs a dynamic component to transition between two components in order to better grasp routing in Vue.
Using buttons, we may move between the components:
Example
FoodItems.vue:
					<template>
    <h1>Food!</h1>
    <p>I like most types of food.</p>
</template>
AnimalCollection.vue:
					<template>
    <h1>Animals!</h1>
    <p>I want to learn about at least one new animal every year.</p>
</template>
App.vue:
					<template>
  <p>Choose what part of this page you want to see:</p>
  <button @click="activeComp = 'animal-collection'">Animals</button>
  <button @click="activeComp = 'food-items'">Food</button><br>
  <div>
    <component :is="activeComp"></component>
  </div>
</template>

<script>
export default {
  data() {
      return {
        activeComp: ''
      }
    }
}
</script>

<style scoped>
  button {
    padding: 5px;
    margin: 10px;
  }
  div {
    border: dashed black 1px;
    padding: 20px;
    margin: 10px;
    display: inline-block;
  }
</style>
From Dynamic Component to Routing
Since we use Vue to create SPAs (Single Page Applications), our application just has one *.html file. This implies that in order to display various content on our page, we are unable to point users to additional *.html files.
Although we can use routing to do so, we are unable to provide someone else with an address on the page in the example above that would route them to the section on food.
If routing is configured properly, you will get at the section containing the food content when you launch the Vue application with an extension to the URL address, such as “/food-items.”
Install The Vue Router Library
Use the terminal to install the Vue Router library in your project folder in order to use routing with Vue on your computer:
Update main.js
We create a router in the main.js file in order to leverage routing.
main.js:
					import { createApp } from 'vue'
import { createRouter, createWebHistory } from 'vue-router'

import App from './App.vue'
import FoodItems from './components/FoodItems.vue'
import AnimalCollection from './components/AnimalCollection.vue'

const router = createRouter({
    history: createWebHistory(),
    routes: [
        { path: '/animals', component: AnimalCollection },
        { path: '/food', component: FoodItems },
    ]
});

const app = createApp(App)

app.use(router);
app.component('food-items', FoodItems);
app.component('animal-collection', AnimalCollection);

app.mount('#app')
The addition of lines 2, 8–14, and 18 adds router capability.
Since the components are already included via the router on lines 11–12, lines 19–20 are removed.
Now that we have a router built, it will function only when we add the <router-view> component in the next section. For example, it can open the ‘AnimalCollection’ component if ‘/animals’ is appended to the end of the original URL address. Additionally, the router records the history of your web visits so that you can navigate through it by using the arrows that are often shown in the upper left corner of the web browser, next to the URL.
Use The < router-view > Component
We must use the <router-view> component in place of the dynamic component from the previous example in order to modify the content on our page using the new router.
App.vue:
					<template>
  <p>Choose what part of this page you want to see:</p>
  <button @click="activeComp = 'animal-collection'">Animals</button>
  <button @click="activeComp = 'food-items'">Food</button><br>
  <div>
    <router-view></router-view>
    <component :is="activeComp"></component>
  </div>
</template>
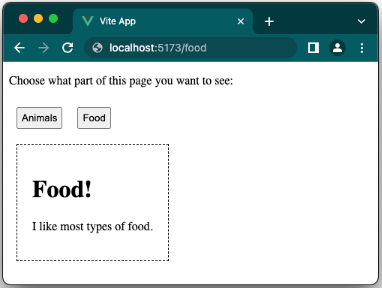
The website should update to display the food content if you make the aforementioned adjustment on your computer. To do this, add ‘/food’ to the project page’s URL address in the browser.

Use The < router-link > Component
Since the <router-link> component functions better with the router, we can swap out the buttons for it.
Since the ‘activeComp’ data attribute is no longer needed, we can remove it. In fact, since the <script> element is empty, we can remove the entire thing.
App.vue:
					<template>
  <p>Choose what part of this page you want to see:</p>
  <router-link to="/animals">Animals</router-link>
  <router-link to="/food">Food</router-link><br>
  <div>
    <router-view></router-view>
  </div>
</template>

<script></script>
Style to The < router-link > Component
The <a> tag is the result of rendering the <router-link> component. If we analyze the element in the browser with a right-click, we can observe that:

Vue also maintains track of which component is active, as seen in the screenshot above, and gives the active <router-link> component (which is now rendered as a <a> tag) the ‘router-link-active’ class.
With the help of the aforementioned details, we can designate which <router-link> component is active:
Example
App.vue:
					<template>
  <p>Choose what part of this page you want to see:</p>
  <router-link to="/animals">Animals</router-link>
  <router-link to="/food">Food</router-link><br>
  <div>
    <router-view></router-view>
  </div>
</template>

<style scoped>
  a {
    display: inline-block;
    background-color: black;
    border: solid 1px black;
    color: white;
    padding: 5px;
    margin: 10px;
  }
  a:hover,
  a.router-link-active {
    background-color: rgb(110, 79, 13);
  }
  div {
    border: dashed black 1px;
    padding: 20px;
    margin: 10px;
    display: inline-block;
  }
</style>
Note: The URL address is not updated in the example above, but it will be updated if you follow these steps on your own computer. Because the routing in the example above is handled internally by the Vue router, it functions even if the URL address is not updated.
